A Camera for eBay
Fuji Finepix A205
The Fuji Finepix A205 was frequently recommended by members on the eBay Photos & HTML Board because you get all the right eBay features for a very small price (under $100). So I decided to get one and review my experiences with it. The camera model is being discontinued and will be replaced by the A-210 (larger image size and 50% pricier), so get it while supplies last.
The Camera
Here's my report on my first use of this camera (from a camera non-expert). I bought the Fuji Finepix A205 camera on eBay for under $100 delivered. Although I have used a digital camera for years, I had never bothered to read the manual or explore the controls. I decided I would take the leap with this camera. Quick Start Guide
Manual Camera settings
The auto settings work wonderfully for daylight photos. This is the first time I experimented with manual settings for lamp-lit shots (below). There were four settings I had to be concerned with: Flash, Macro, White-balance, Exposure.
Turning off the flash and using the close-up macro feature are separate buttons on the camera. "Macro" is on/off, but "flash" is a cycle of choices, and you need to memorize the no-flash symbol.
The other two settings are on the menu and are easy to click through. I selected lighting conditions (daylight, cloudy, lightbulb, etc) for white balance to cope with blue daylight and yellow lighbulbs, and then Exposure compensation (EV) to lighten or darken the results. The EV numbers are easy: plus-numbers for lighter results, and minus-numbers for darker results. The White Balance is a long list of similar-looking tiny icons to scroll through, so you'll need to brush up on them (but there is only one lightbulb). The nice part about these two features is that you can actually see their effects in the viewer.
Photo Editor
The camera came with a suite of software, but you may only want to install the FinePixViewer for it's simple photo editing capability (if you have a photo editor, you don't need to download any of the programs). I used the provided software for scaling down the images and for adding watermark text. The software interface looks really foreign to a Windows user, but it is quite simple to use after getting over the culture shock of the page layout.
In all the photos I posted here, I used the software to reduce the picture dimensions and set the compression to "normal", which is a fair amount of compression. Some of the jewels would look crisper if the compression had been set to "fine". A tripod may help too, as all these photos are hand-held.
Getting Pictures to the Computer
An "upload" popup appeared when I plugged the USB cable to the computer and turned on the camera. I chose to use the popup on most of the picture transfers. At another session I tried a direct drive transfer instead. When you plug in and turn on the camera, the camera memory card is recognized just as if it were a floppy disk, so you can use your Windows file management to look at the camera memory the same way you look at a floppy.
Batteries
I used up my first set of batteries after 38 shots, a flash, five downloads, and a lot of zoom motoring for photos I didn't take. For the next round, I will get the NH-10 rechargeables. The batteries can be recharged while still in the camera if you purchase the separate recharger.
The camera can NOT use lithium batteries, so that means the rechargeable batteries must be run down completely before recharging. I also think it would be a good idea to get the AC adapter for the staged indoor shots and for computer downloads.
Sample Photos
Backlighting Clear Items: I had a desk lamp with a 50-watt halogen bulb shining on a piece of white paper and held the colored plastic tubes about 6 inches in front of the white background. The lighting is from the side and there is just a little reflecting off the surface of the tubes.
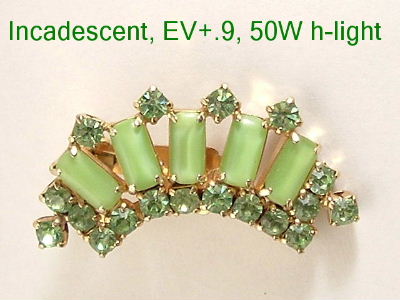
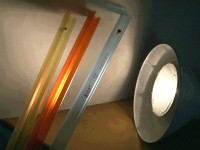 I set the camera to 0.3M image size, set the camera to manual mode, disabled the flash, set the white balance to incadescent, and EV exposure compensation to +0.9 (which may be a little high and washed out).
Then I plopped the photo in the FinePixViewer that came with the camera (a little strange to use at first) and cropped it down (simple), added a watermark (simple), and saved to medium quality. And here it is - my first Fuji A205 photo:
Took me about 2 hours start to finish to set up the camera and software, figure out the settings, and snap a few photos.
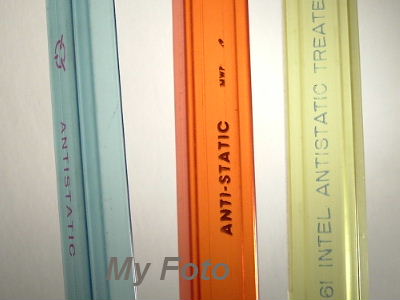
 Jewelry Closeups: Here is a very crude lighting setup for a small closeup item, also taken without a flash. The single lightbulb reflected off the white wall and got rid of a lot of the shadows. All I did was set the camera white balance to indoor lighting, and then brightened up what would be a dark sceen by adjusting the camera's EV setting to a higher number. Of course, I used the camera's closeup macro setting to get within about 6 inches of the item.
Then I compressed the image down quite a bit to show it here.
As you can see, the photo turned out pretty well for a hand-held quicky setup with a lot of compression.
These are the features you'll want to look for in your manual, regardless of brand name:![]()
![]()
And those are the main settings that you'll need for taking closeup shots of jewelry. Once you set up your photography stage for your jewelry, you should be able to use the same settings for the whole session.
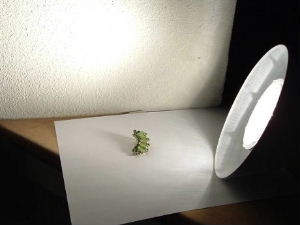
 White on White details: White-on-white is tough, but I tried it to see what I would get. I used only one light down low on one side, because I wanted to get as much shadowing as possible across the disparate materials (like the long shadows you see at the beginning or end of the day). So this is the general idea of what I set up:
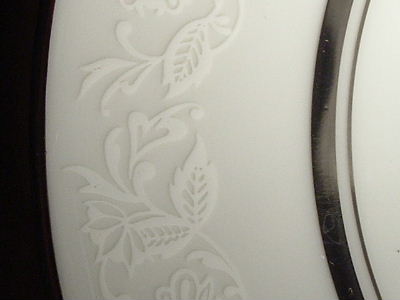
I adjusted the angle as necessary until I could see the best contrast through the viewer. I then set the camera white balance to +0.3 (to compensate for the excess white in the closeup) and shot this photo.
FinePix Viewer to Auction-Ready
Even using the lowest camera settings, pictures straight off the camera can be too large for an auction.
If you are using the Fuji FinePix Viewer to edit your photos, here is where you start:
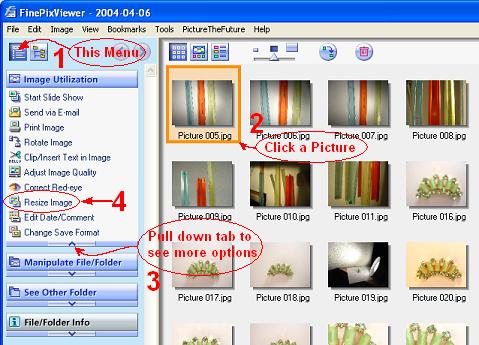
These are the steps you might use:
- Rotate Image. Only if necessary
- Adjust Image Quality. Optional, if you need to tweak the colors, brightness, or sharpness.
- Clp/Insert Text in Image: Crop the photo if you wish to eliminate excess background around your subject. I wouldn't add text at this stage, since it may become a little fuzzy if you further reduce the image. So save the text for a later step.
- Resize Image. You will almost always need to resize to the proper dimensions for your auction, unless you already cropped your image considerably.
- Clp/Insert Text in Image: After resizing, you may wish to add text as a watermark.
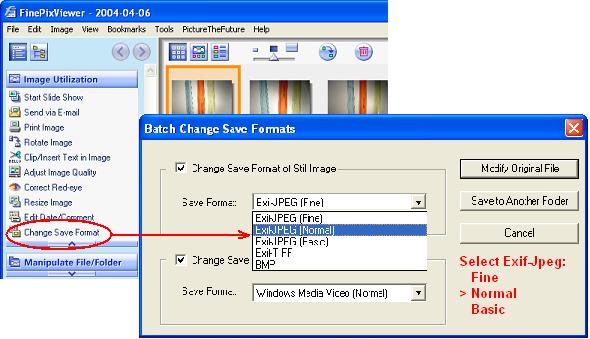
Whenever you modify the image and are given the option to "Close after Saving", you will get a "Save As" screen where you can change the file name and compression quality. The program defaults to "Fine" compression, and I use that setting for all the intermediate steps. But on the very last save, after the last edit, I choose "Normal" compression for eBay.
- Change Save Format: Modify the compression by selecting a lower quality setting. The program defaults to "Fine", which is not much compression. In the example below, we have chosen "Normal" as a good setting for eBay. If you would like to keep this setting for future "Save" functions, then uncheckmark the box that says "Change Save Format of Still Image" and "Normal" will become the default instead of "Fine".