 Auction Photos
Bypassing eBay's Photo Hosting
Why use EPS and Why Not?
Using eBay Picture Services (EPS) as your image host is a one-stop solution to placing photos in your listing. With EPS, you can browse and upload images from your hard drive and EPS will resize and compress them to an appropriate size for web viewing. Your uploaded photos will automatically appear in your listing, and a thumbnail gallery will be created for multiple images.
However, there are various reasons you may not wish to use EPS, such as limitations on the number of photos, size, or quality, the cost involved, computer incompatibility, or security settings that prevent you from using EPS. In those cases, you may wish to use another source for hosting your images for auctions, like a website or image hosting service.
eBay will not charge any fee for images that are inserted into the description using third-party image hosting, although you may or may not be paying a monthly fee to the provider of the hosting service. To have your photo appear in eBay's search results, you will need to either upload a photo directly to eBay or provide them with a link to your hosted image, which they will rehost on their server for the search pages and for the first free photo in the listing.
eBay Picture Services: http://pages.ebay.com/help/sell/pictures.html
eBay Troubleshooting: http://pages.ebay.com/help/sell/pictures-basic-troubleshoot.html
Why do I need a Host at all?
Fortunately, you can't merely have people peek into your hard drive for your photos, because you don't really want outsiders in your personal computer (that's what viruses are all about - outsiders accessing your personal computer). Therefore, images need to be hosted online for viewing, and websites are the place to host them so they'll have an internet address where folks surfing the internet can find them.
EPS is eBay's website for hosting your auction photos, and you can use other websites too. When not using eBay hosting for auctions, it is called third-party hosting because the hosting is off-site, although we often refer to it as self-hosting, which is really a misnomer that rolls more easily off the tongue.
Image Hosts
If you already have a website, that is the place to host your auction photos. Many people will discover that they have personal webspace from their internet service provider (a rather common example was AOL before they discontinued the service), and those sites may allow you to use your space for auction photos. Then there are sites that are dedicated to hosting images, where you can have your own personal account or where you can use anonymous hosting.
You will find lists of eBay-friendly hosts here:
http://www.zoicks.com/imagehosts.htm
http://www.ourhutch.com/examples/freepay.html
http://www.free-webhosts.com/auction-image-hosting.php
Storage and Bandwidth Limits
When using third-party hosting, you'll want to be aware of storage limits and bandwidth limits. Storage is the amount of disk space allocated for storing all of your images and files. You can delete old images and add new ones to manage your storage space, but the images must remain untouched on your site for the duration of the auction if you want the images to continue to appear in the auction.
Bandwidth is the amount of traffic your images generate for the server storing the images. Using a few images in a few auctions with normal traffic of around 30 hits per auction is pretty nominal bandwidth useage, and most hosts will support that. But power sellers with a lot of items, or auctions with a lot of hits (like motors auctions) can quickly run over the daily bandwidth limit allowed by the image host. You may find your images disappearing from your auctions during busy periods if your bandwidth is exceeded. Most of the image hosts have upgrade options for more storage and bandwidth.
More Bandwidth and Storage info here:
http://www.isdntek.com/demo/filesize.htm
Image Size Limits
To help manage storage space and bandwidth useage, some hosts limit the file sizes that may be uploaded to the site, or may resize the files after they are uploaded. The size limit refers to the file itself, not to the physical dimensions of the photo. You can often get the same size photo into a smaller file size by using compression (more on that in the picture prep section).
Blocked Hosts
Some image hosts do not allow remote linking. Remote linking (hot-linking) is where the page that calls the image is not on the same site that hosts the image, and all of our non-EPS images are remotely linked from our image host into our eBay auctions.  The image hosts have their various reasons for barring linking, and when they block the image request from your eBay auction, your image will fail to appear in your auction and we'll see the dreaded red X or "pizza box".
Some people think eBay is doing something to punish them for using their own image hosting, but the undramatic fact is that eBay doesn't care at all about your third-party image hosting. When third-party images fail to appear, it is NOT eBay's fault.
Bob has helpfully compiled a list of servers that block remote linking:
http://www.isdntek.com/bulls2/blockedservers2.html
Preparing your Photos
When using EPS, your photos are automatically resized and compressed for the web. When hosting your own, you must attend to those important details yourself. Most cameras come with some image editing software to allow you to crop, resize, rotate, and adjust your photos.
Average images should be no more than about 500-640 pixels wide for auction viewing. If you want them side-by-side in your auction, then they should be about half that wide. When saving your resized image, set the compression or jpeg quality to reduce the file size. Typically, set compression to around 15% or jpeg quality to around 85%, and aim for a file size that is between 25K and 50K bytes (or up to 70K bytes for larger images).
http://www.isdntek.com/demo/merrypicprep.htm
Naming your files and folders
When preparing images for the web, there are special considerations for naming your files and folders on your image host. Avoid using spaces in the image name, as some hosts and older browsers may have difficulty with spaces. Spaces are commonly used to indicate the end of a tag parameter, so a space in an image can prematurely truncate the image command. If you need to use long descriptive names in your image or in naming a folder on your image host, use the underscore character instead of spaces: my_image.jpg
Avoid all other punctuation in image names, as punctuation characters can have special meanings to the server.
Also be careful about capitalization, as many image hosts are case-sensitive. An image named myimage.JPG is not the same as myimage.jpg on most servers, so the file won't be found if the wrong case is used. Professional designers tend to use all lowercase so that they don't have to remember which names had capital letters in them.
And do remember to add the proper suffix to your image name. Most images are created as JPG images, so the .jpg suffix will be the most common type used in auctions. You can't change the image type by merely changing the suffix. The image type must be converted by an image editor, so be very careful not to accidentally rename an image to the wrong suffix.
Uploading
Web Upload
Most image hosts have some sort of online uploading facility so that images can be uploaded from your browser screen. Usually they provide a browse button for finding an image on your hard drive. Then the image is uploaded to their servers. The browse button will look and operate just like this, although this sample button won't do anything with your found photo.
While web-based uploaders are simple to use, they usually limit upload speed, since a field must be completed for every image that is uploaded.
FTP Upload
Some image hosts, and most websites, have FTP (File Transfer Protocol) upload capability. That feature will allow you to bulk upload lots of files and/or folders at one time. There are many different FTP software packages available, but I like to use the FTP uploader client that is built right into Internet Explorer.
Internet Explorer will give you a view of your webspace that looks just like any other folder on your computer so that you can drag your images from your desktop folder to your website folder. Read more here about using Internet Explorer for FTP uploads:
http://www.isdntek.com/demo/ieftp.htm
Image Codes
To use third-party-hosted images in your auction, they will need to be added to the description area, rather than using the image slots on the listing form. While you could just type the photo's web address into your description, special HTML codes allow the images to actually appear on your page.
Image Tags
This is what the web address (URL) might look like for a typical image:
http://www.myhost.com/image.jpg
Here is an image tag with the image URL address inserted:

<img src="http://www.myhost.com/image.jpg">
If you string two codes together without a space between them, they'll appear side-by-side and may require horizontal scrolling if their combined widths are too wide for the screen:
<img src="http://myhost.com/img1.jpg"><img src="http://myhost.com/img2.jpg">
To place two narrow images beside each other, either add a space between their codes or put them on separate lines. They'll appear side-by-side on wider screens and will wrap for narrower screens:

<img src="http://www.myhost.com/image1.jpg">
<img src="http://www.myhost.com/image2.jpg">
To force photos one below the other, add one or more line BReak codes after each image:
<img src="http://www.myhost.com/image1.jpg"><br><br>
<img src="http://www.myhost.com/image2.jpg"><br><br>
If your images touch or seem too close together, a little gap can be added by including some spacing codes in your image tags:
<img src="http://www.myhost.com/image1.jpg" hspace="5" vspace="5">
Additional Formatting
There are a few more things you can do with your images using the Standard editing tab of the Enhanced Listing Editor. But we'll also show you how to do it in code, in case you don't have access to the enhanced editor. The line BReak code is handy for alternating images with text, since the BReak code will drop the text down a line:
<img src="http://www.myhost.com/image1.jpg"><br>
Descriptive text here.<br><br>
<img src="http://www.myhost.com/image2.jpg"><br>
More descriptive text here.<br><br>
To center your images, just wrap a single image or a group of images in the Center tag:
<center>
<img src="http://www.myhost.com/image1.jpg">
<img src="http://www.myhost.com/image2.jpg">
<img src="http://www.myhost.com/image3.jpg">
</center>


Or like this:
<center>
<img src="http://www.myhost.com/image1.jpg"><br>
Some descriptive text. <br><br>
<img src="http://www.myhost.com/image2.jpg"><br>
More descriptive text. <br><br>
<img src="http://www.myhost.com/image3.jpg"><br>
</center>
Some descriptive text.
More descriptive text.
Use the alignment code to position the image on the left with text wrapped around the right. The image code must preceed the text that will wrap:
<img src="http://www.myhost.com/image.jpg" align="left"><br>
Follow the image code with all of the text that will appear
to the right of the image and will wrap under the image.
To stop the wrapping, use the modified break code.
<br clear="both">
As you can see, the spacing attribute should be used to add a gap between the image and the text, so add hspace="10" to the image code above. The additional attributes can be added in any order to the image tag. An image on the right is identical, replacing "right" for "left" in the code. When using images this way, be sure that the image is small enough that it allows adequate space beside it for the text. A skinny little column of text is very difficult to read.
Clickable Images
When using only a few images, the image codes above work just fine. But if you have a lot of images in your page, you may find the page will load too slowly for dialup users, and it may tend to get cluttered as well. Clickable thumbnails are the solution to both problems.
Thumbnails are a second set of images that are reduced to a small physical size and a small file size. The files are typically under 5K bytes, so you can put a lot of them on a page and still have the page load in a reasonable time. The beauty of thumbnails is that the page loads quickly so the buyer can decide if they are interested in the product. They can then choose to look at the larger photos in whatever order they prefer, typically by clicking on the thumbnails.
Thumbnail galleries can be presented in a variety of different formats. This page displays quite a selection of formats:
http://cgi3.ebay.com/ws/eBayISAPI.dll?ViewUserPage&userid=merrygocats
Simple Clickable Thumbnails
The code for a simple clickable thumbnail looks like this, and some image hosts automatically prepare that code for you:
<a href="http://www.myhost.com/bigphoto.jpg"><img src="http://www.myhost.com/smallphoto.jpg"></a>
The larger image will open in the same browser window and you can use the back button to return to the auction. If you would like the larger photo to open in a new browser window, then add the "target" code shown below:
<a href="http://www.myhost.com/bigphoto.jpg" target="_blank"><img src="http://www.myhost.com/smallphoto.jpg" ></a>
Some users want to get rid of the link border around the thumbnail because it may clash with their auction. The link border may be blue or purple, but is entirely dependent on the viewer's browser settings. If you decide to eliminate the link border, be sure to mention nearby that the thumbnails should be clicked for a larger view.
<a href="http://www.myhost.com/bigphoto.jpg"><img src="http://www.myhost.com/smallphoto.jpg" border="0"></a>
Click-Galleries
![]() Click-galleries display the enlarged image in a window within the page and are a nice clean way to keep your viewer on your page. Click galleries always rely on javascript coding in one form or another. About 10% of the browsers out there don't have javascript enabled, so the better click-galleries will include the simple method so that browsers without scripting can still use the galleries.
Click-galleries display the enlarged image in a window within the page and are a nice clean way to keep your viewer on your page. Click galleries always rely on javascript coding in one form or another. About 10% of the browsers out there don't have javascript enabled, so the better click-galleries will include the simple method so that browsers without scripting can still use the galleries.
Clic*Pic is a PC desktop program that will crop, resize, and compress your photos, make the thumbnails, and generate the click gallery code, all in one click. The new images must then be uploaded to your image host and the gallery code can be pasted into your auction.
http://www.isdntek.com/clicpic.htm
The online version of Clic*Pic uses images that are already presized and uploaded to your image host. It is ideal for use with image hosts that automatically create thumbnails.
http://www.isdntek.com/tagbot/gallery.htm
Online X*sell creates a scrolling gallery. While it is most noted as a cross sell tool to display your other auctions, it also has a custom setting where you can enter your thumbnail address and your large image address (along with a short caption) for each of your already-hosted images.
http://www.isdntek.com/tagbot/xsell.htm
Adding the Code to your Listing
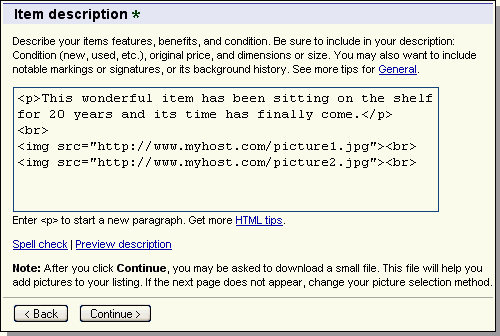
To get the image to appear, rather than just seeing those codes on your page, the image code must be added to the "HTML" tab of the listing form (or Turbo Lister), as shown below.
If you aren't using a
• Internet Explorer 7 or later for Windows.
• Mozilla Firefox 3 or later for Windows or Mac.
• Google Chrome 8 or later for Windows.
• Apple Safari 2 or later for Mac.
supported browser, or don't see this option, then you may see a plain text editing window, without a toolbar, and you can add your code there.
Place the image code wherever you want it to appear in the text. If you are not accustomed to looking at a page of code, then add a placemarker (like *****) in your auction in the Standard tab to make it easier to find in the HTML tab.
Customize with Enhanced Editor
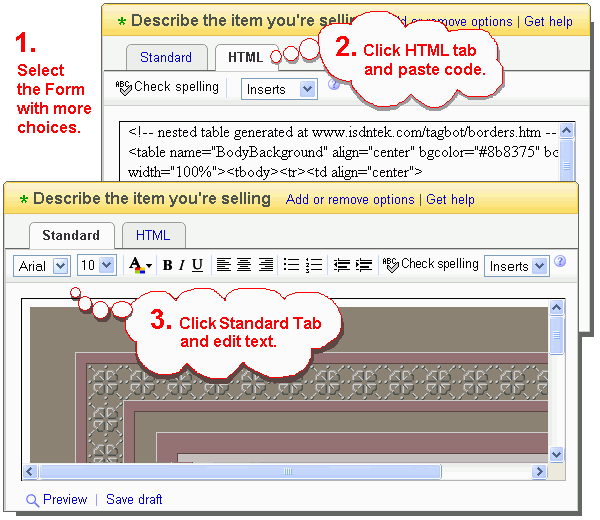
Can't add Codes in the Simple Editor
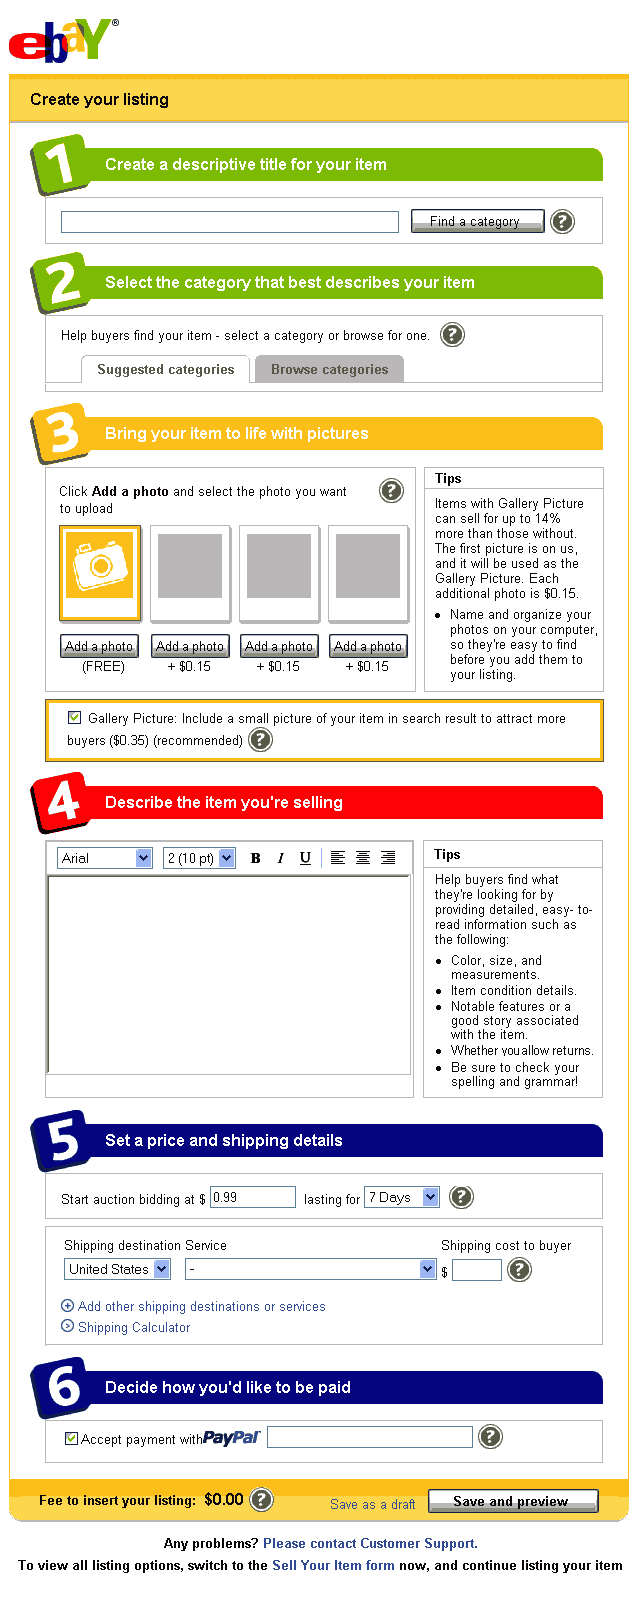
eBay now has two versions of the online listing form. The "Customize" lister (also known as the Sell Your Item or SYI form) above, and the "Simple" lister with big section numbers below. The "Simple" lister has only the enhanced (RichText) editor without the HTML tab, so you can't add your image codes there.
If you find yourself on the Simple lister form, there is a link at the top of the form to switch to the "form with more choices" where you can customize.
Enhanced Editor on eBay Motors
On the eBay Motors site, you may still find yourself using the older SYI form. The functionality is identical to the Customize form if your browser is Internet Explorer.
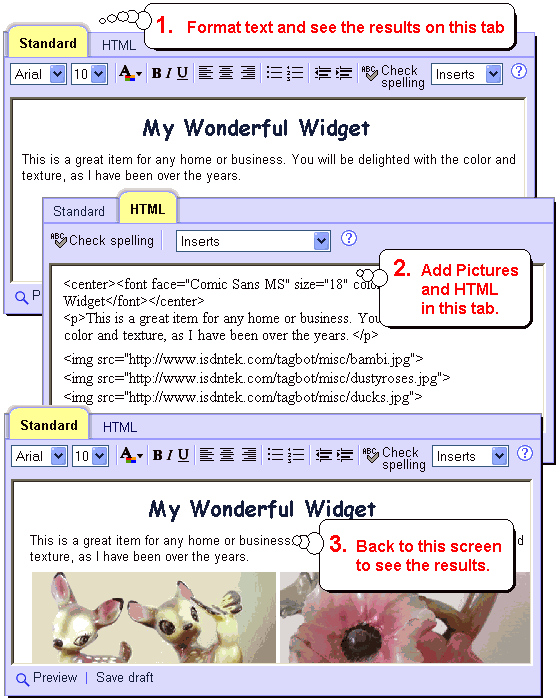
If you are using any other browser, you will encounter a plain text box while listing on the Motors site. You must use HTML codes in the text box to format your description.

copyright 2006-2011 © www.isdntek.com/etools.htm
