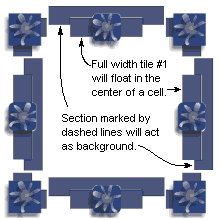
Load a Border ImageThis tool works with images that are on your computer, not online images. Browse your computer for an image and click the Load button. The image will appear in the workspace below, with guidelines overlaid. Mark your ImageOn the workspace below, drag the flags to move the guidelines. The lines mark where the image will be diced. There is no need to position lines at the edges of the image, as the image edges are automatically taken into account. If the flag text is red on gray, it is on or beyond the edge of the image and will be ignored. A guideline marks the left or top of the segment, and the segment above or to the left will end on the pixel before the line. 

Process the slicesClick the "Process Codes" button when the guidelines are in place. This step can be repeated if you need to move a line. When the image is processed, two codes will be created. The DOS file will run free IrfanView to slice up the images, and the HTML file can be used afterwards to view the segments in a template. Run IrfanView from a DOS batch fileTo save the DOS file, open Notepad or create an empty notepad text file. Paste the contents of the Dos Batch File window into notepad and save the file to something that will represent this particular border. (You will create a separate batch file for each border.) Be sure the file type is set to ANSI, as that is the only acceptable type for DOS. Change the file suffix to .BAT so that Windows will recognize it as an executable DOS file. After you have finished creating that file, you can click it to run the program in a black DOS window. In most cases, it should run normally, but if IrfanView is not in the expected directory, or if any other files have moved since creation of the batch file, you may encounter an error. The DOS file can be edited in Notepad to correct the Irfanview directory if necessary. View the slices in an HTML templateOnce the segments have been generated, the Preview button on the HTML code window can be used to test the segments in a template. The template code can also be saved in Notepad with a file extension of .HTM so that the browser will recognize it as web code. The code in the template is going to point to the image segments on your computer. After uploading the segments to your website or to an image host, the paths in the sample code should be changed to point to the online images. |


 Copy the DOS code and paste it into Notepad. On the "Save As" screen, choose "ANSI" encoding,
and "All Files" as the type. Then enter a file name and end it with a .BAT file extension to
indicate it is a DOS batch file. A BAT file will execute when clicked. This batch file will ask if you want to continue or abort when started.
Copy the DOS code and paste it into Notepad. On the "Save As" screen, choose "ANSI" encoding,
and "All Files" as the type. Then enter a file name and end it with a .BAT file extension to
indicate it is a DOS batch file. A BAT file will execute when clicked. This batch file will ask if you want to continue or abort when started.