The top toolbar drops open when hovered and automatically closes when departing.
This keeps it available, yet out of the way, when editing the template.
Checkmark the option in the toolbar to lock it open for frequent use.
Uncheck the option and move out of the toolbar to close it.
The toolbar Ruler displays width in pixels.
Click ruler at desired template width or click 0 (or anything less than 100) on the ruler to return to flexible width.
The outer background/border is part of your template, and acts like a page background.
It will stretch to fill the page width.
The next inner border is the one with the defined width.
Inner content, like photos, may force a template wider than the selected ruler setting.
(See notes about scripts if your workspace template appears too wide.)
Borders (Pretty Borders nested tables)
Click a border on the template. Each border is an HTML table component.
(The outer background is also a border.)
Drag border to resize. This will adjust cellspacing or cellpadding in the table code.
Click a color from the toolbar palette to colorize the selected border.
Click a background tile from the toolbar - or add the URL for your
own hosted tile in the toolbar slot and press the keyboard enter-key to apply.
The "no tile" button can be used to remove a tile from a selected border.
Click the next border and repeat.
Note:It is important that you choose a background color when using tiles so that if the tile is
slow loading or fails to appear on your auction page, there will still be an attractive border color.
Always add a solid color behind the text layer, even if you also have a fairly smooth background tile,
so that the text is immediately readable, regardless of the state of other border layers.
Need border ideas? A droplist of premade borders is provided above the workspace. Select one as a starting point and play around with different colors or patterns.
Photos
There are 5 photo slots on the template - a main image at the top and a group of four in the middle. The top image can be either a logo banner or auction photo.
Add an online photo URL to image slot (starting with http://). Double-click photo to view if it doesn't automatically appear.
Drag photo to resize or double-click photo to return to actual photo size.
The middle photos will appear inline as a centered group, so, depending on the image width and template width, more than one may appear on one line.
To remove a photo, erase the URL. Double-click photo to minimize its placeholder.
If adding a long URL stretches your screen, see notes in the script section.
Hint: triple-click to select entire URL.
Titles and Text
Change the names of the titles. Erase title to omit.
Change the content of each descriptive box. Typing will stretch box. Erase text to omit.
Click text box and and use toolbar options to set font size, styles, and alignment for entire block of text.
Click text box and click rainbow palette to change text color for entire block.
Regardless of paragraph alignment, bullet lists will always be left-aligned in the code.
Note: this is not a text editor, so individual words can't be separately styled.
Technical: For users not wishing to code any HTML, the tool will automatically insert
linebreaks, bullet lists, and paragraph codes in the text blocks.
For users who DO want to use a bit of HTML in the text areas,
if your text includes a <p> or <div> block-level tag within a standard text block,
the program will not style that block and will assume you are using your own HTML.
If you avoid block-level tags, you can, however, add <font>, <span>, <b>, <i>, <img>, <br> and other similar
inline tags to your text to modify individual words, and the program will accept the text,
while still adding the line breaks, paragraphs, and lists. There are other block-level tags that aren't trapped,
and using them may cause the selected font styles to end in some browsers at the beginning of that inserted block-level tag.
Similarly, image code can be added to the title slots in addition to, or instead of, the title text.
The code will be wrapped in the default <h2> heading tag without any filtering.
If only the URL is inserted in the title slot, an image tag will be constructed.
Add your own Scripts or Code
The template has two boxes for custom codes or scripts.
Add buttons, a counter, photo gallery, cross-sell gallery, or other custom scripts.
See online tools (above right) for buttons, charts, gallery, Qsell, shadows, Xsell.
(Hint: copy the color code from the toolbar palette and paste into one of the other tools to color-match the add-ins.)
Note: wide URLs and scripts in Internet Explorer may stretch the workspace or template editor
and the scrollers may disappear off to the right. If this poses a problem,
checkmark the box in the toolbar to "shrink code boxes", which will resize the URL and Code boxes.
It won't adjust the text or title boxes.
Make HTML Code
Click the "Make Code" button below the template to create the HTML.
Click the "Preview" button to see the HTML code as an actual page, then close the preview.
(If the preview fails to appear, it may be behind your browser window, or may be stopped by a popup blocker.)
You can edit and repeat as frequently as needed.
When satisified with the results, copy the Code from the box and paste into your auction
or paste into a text file on your computer. Or click the button to download the contents of the code window (the full template) to a file on your own computer.
It is best to use a plain text editor like Notepad for saving and modifying HTML code.
The Popup Preview button at the top of the template combines the Make and Preview into one function.
The functions are on separate buttons at the code window for designers who want to edit the HTML directly and preview.
Note: the popup window should appear at 800 wide, the smallest browser size to be concerned with.
If your live content (the actual text and images) fit within the window without scrolling, the template width should be ok.
Most browsers are now 1024 pixels wide.
Did you know you can save up to 30 border ideas right in the droplist?
If you've created your own border and want to try out other color variations,
scroll to the bottom of the droplist and click the option to add your border to the list.
You'll be able to continue with other iterations and come back to the list to compare them.
The action will refresh the HTML code in the "Make Code" window,
so if you have edited the HTML directly, you may want to save it before proceeding.
Do you want to come back to one particular border setting later? After making the code, click the link underneath.
A new browser window will open with a path to your template settings. Bookmark that page, and then close the extra window.
Your template colors will then be saved in your browser bookmarks.
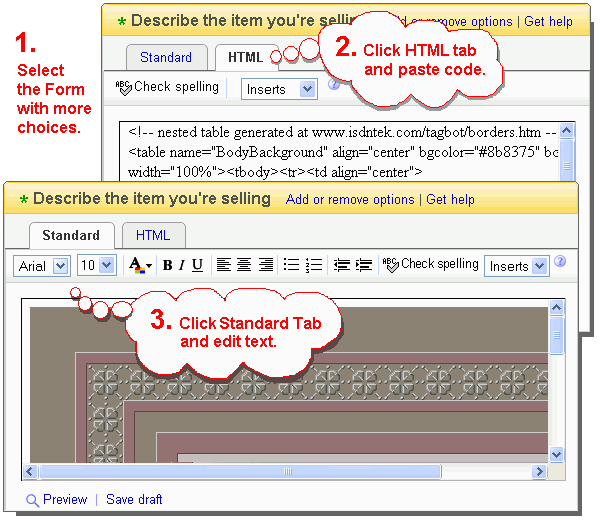
Add Code to eBay
One way to use most templates, whether from a designer or from a form filler tool,
is to paste the code directly into the online listing editor.
Since there are two ways to start a listing (Simple or Customize), be sure to start with the Customize option.
Then you will see the two-tabbed editor. Click the HTML tab to add your code.
Flip back to the Standard tab to see your template, where you can continue to edit your text.
Terms of Use
Personal use: For personal use in your own auctions,
you may use and hotlink to the background icons this tool adds to your template,
provided the copyright notice remains intact. For your convenience,
the graphics may be rehosted on your own server for continued use
in your template and derivative works.
Resale: If you plan to sell the templates you create with this tool,
any selected icons must be rehosted on your own server,
and the image links in the code should be changed to match.
When these icons are used in this or derivative works where the visible copyright notice is changed,
please maintain a small graphics copyright acknowledgement within the source code.
Tool and Graphics All of the transparent background tiles used in this tool
are original designs created for this and related tools.
This tool and/or its graphics may not be resold, distributed, repackaged,
or bundled by any means for distribution or sale; except that template designers
may rehost and provide to their buyers any individual icons used in a specific template.
In no case should the example auction images be used in auctions or be transferred to others.