The Active Content Bulk Editor is designed to locate and repair Active Content in your eBay listings.
The scanner first retrieves a copy of each of your item descriptions, scans that copy to remove active content,
and then writes that repaired copy (and a backup of your originals) to our server.
The zip files on our server are made available for download to your computer,
where you can unzip and use the files as needed.
Nothing on your account has been changed at this point, as only copies were made.
You will control modifying your listings. The file that you will save to your computer, and then unzip,
will be a spreadsheet containing all of your repaired item descriptions.
The next step after unzipping is to upload that spreadsheet to eBay through eBay's File Exchange.
File Exchange will read each description out of the file and replace each description in the appropriate listing.
Listings that can't be revised due to status (bids, ending soon, ended) will be skipped and will remain unchanged.
This page will walk you through the basic end-to-end workflow, ignoring and skipping the more advanced features of the tool.
For an overview of advanced features that may be of interest,
including larger scans, limited scans, and custom filters, please review the instructions at the bottom of the Active Content Bulk Editor.
Rev: 11 Sep 2019
Use the Active Content Bulk Editor
to Bulk Revise eBay Listings through File Exchange
Overview
STOP: Before you revise numerous listings in bulk, check whether removing active content will disable important features down in the description. If you have a template with a clickable photo gallery, terms tabs, or custom store menu, first preview your listing within the Sandbox tool or use eBay's "active content preview" feature directly in the listing. If you have any of these features and the test shows they will no longer function, you may want to have your template redesigned instead of disabling those features here.
Tools Required
- The Active Content Bulk Editor - for scanning and creating revision files.
- eBay File Exchange - for sending revision files to eBay.
- Spreadsheet reader, Excel, or Open Office - for reading File Exchange reports (reqd).
Instructions
- Subscribe to File Exchange.
A File Exchange subscription is free and carries no obligations. U.S. sellers may use the "Subscribe" button at the top of this eBay page:
https://pages.ebay.com/seller-center/listing/listing-advanced-sellers/file-exchange.html
Subscribing merely sets a token in your eBay account. As such, you will be asked to log in to eBay, agree to their terms of use, and that's it.
Sellers may subscribe to file Exchange on these other sites. The Euro sites have certain requirements, which might include: business seller account, 90 days on the site, over 50 sales per month. US | CA | AU [ UK | DE | FR | IT | AT | ES ]
- Load eBay items.
Open the Bulk Active Content Editor.
https://www.isdntek.com/ebaytools/ActiveContentEditor.htm
To start a basic scan, enter your seller name (not your store name) and select the site where your items are listed. Click the "Get eBay Items" button to collect your item list from eBay. Long lists may take a few minutes to retrieve.
TIP: If this is your first time, we recommend an end-to-end trial using only a few item numbers. Pick three item numbers and add them to the "Keyword search" slot to the right of the big button before clicking the button. Put the numbers in parentheses like this (380647614391, 222437587690, 381999765983). Remember to remove them when you are ready to run a full scan.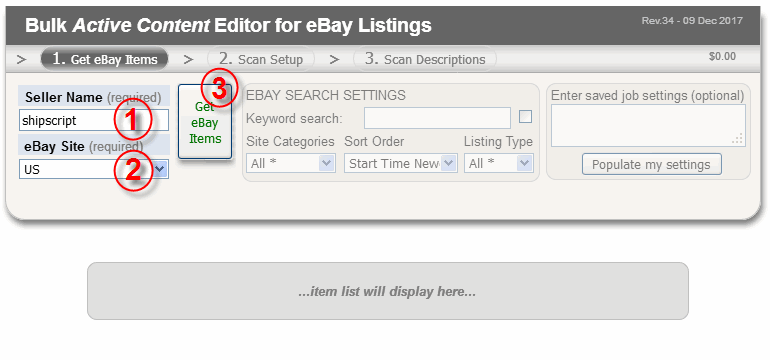
If you have more than 10,000 items to scan, or have Adult items or Stock control, read the advanced instructions at the bottom of the Active Content Bulk Editor to learn how to load File Exchange data into this tool for faster scanning. - Scan Setup.
When the eBay listings load, the "Scan Setup" tab will open and will advise the number of listings to be scanned. Use the preselected scan settings, or add your own. Then click the "Start New Scan" button and watch the tool scan through each of your items. The full scan could take half an hour for many thousands of listings.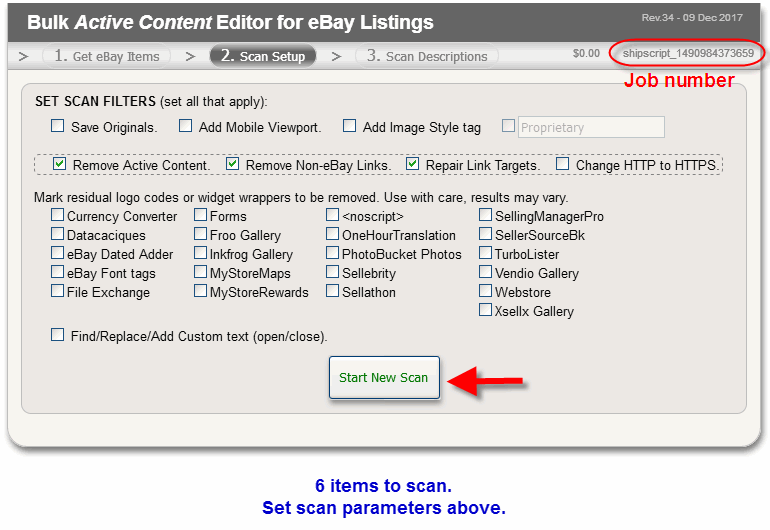
- View Scan Results.
When the scan completes, the tool will display colorized rows of items so that you can tell at a glance which items are affected. Many different issues can affect a single listing, so the tool picks the worst of the issues as the color for the entire row. However, the individual issues are also counted in the small colored boxes at the right end of each row.
Red rows contain Active Content and non-eBay links, to be removed, and missing link targets that will be repaired.
Orange rows indicate non-secure media (like images) that should either be delivered from a secure (https) server or be removed. If you have checkmarked the HTTPS box, then the tool will change the http protocol in the code to https. But be aware that if the server delivering your media does not support the HTTPS protocol, your media will fail to display.
Yellow rows indicate selected widgets that have been located and will be removed.
Blue indicates content will be added by widgets or will be added, removed, or modified by custom phrases in the custom find/replace fields.
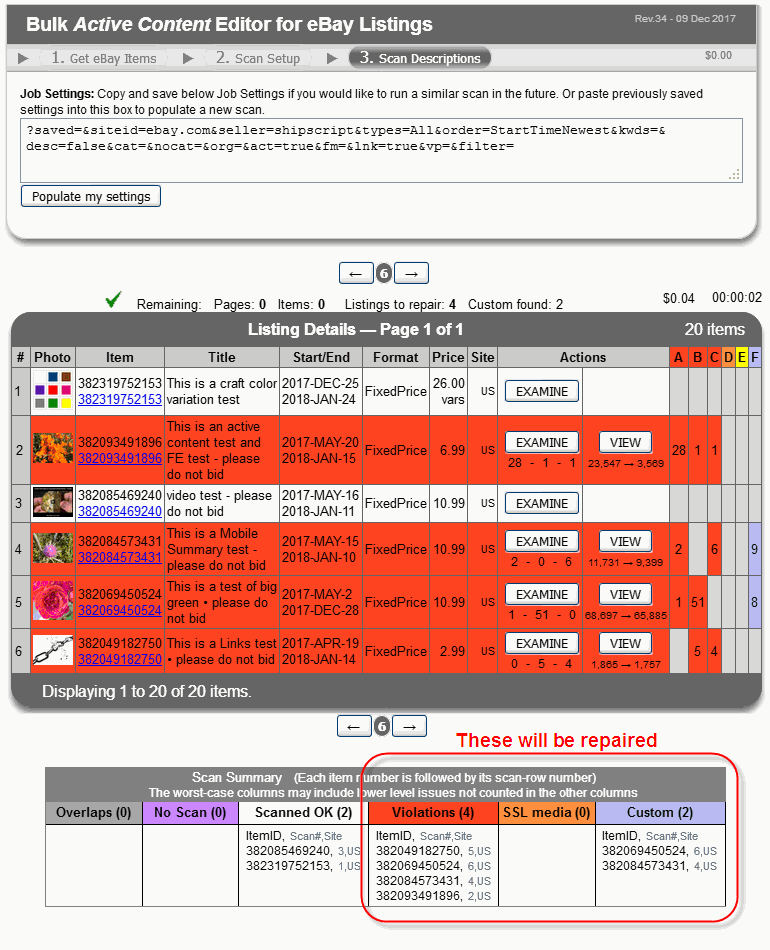
At the bottom of the scan is a table of item numbers categorized by the type of issue found in each listing. Items in the red, orange, and yellow columns will be repaired in the revision files. If you selected one of the custom filters, you may also see a blue column of numbers and those will also be repaired. The tool has already stored those corrected descriptions on our server.
- Retrieve Repaired Files.
Below the scan are three closed panels that offer zip downloads of your data. Open the first panel to retrieve downloads for File Exchange revision. The left box will offer one or more backup spreadsheets of your original descriptions, while the right box offers the revision spreadsheets for File Exchange. Click the rightmost zip button ("Revised File Exchange CSV") to create CSV Revision files that are compatible with File Exchange, which will then be stored on our server as one or more zip files.
Most sellers will not need the remaining panels. The second panel contains the original descriptions and repaired descriptions in HTML format. The third panel offers CSV scan reports: a duplicate of the colored report shown by the tool, and a scan report that also includes original descriptions.
After the zip files are created, you will see them appear in the file list in the window. When you see "end of files", you may click each link to collect your Revision zip files from our server and save to your own computer.
We recommend you also zip and download the adjacent "Original File Exchange CSV" to save a backup of your originals.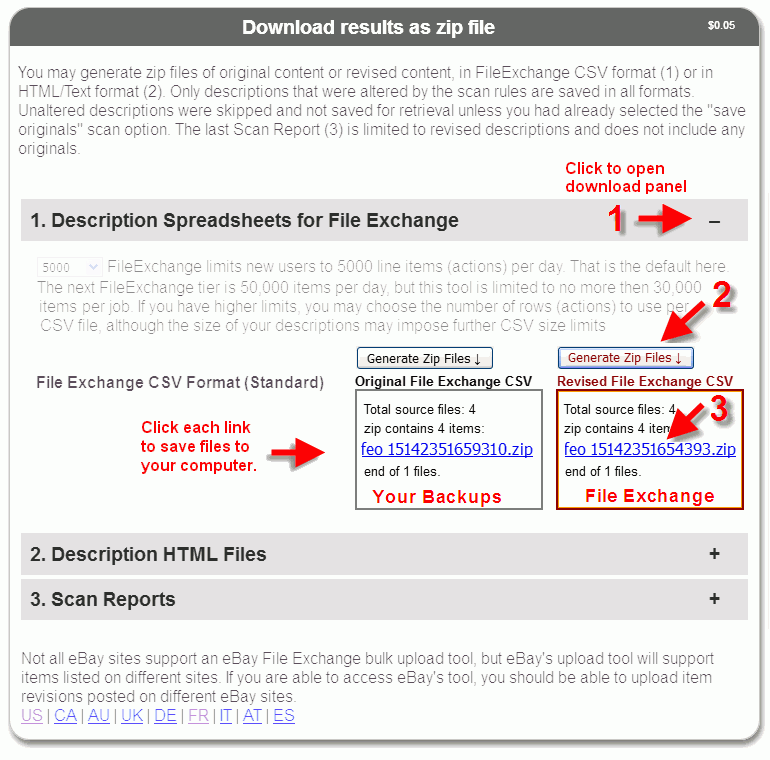
The "feo_" zip files contain your Originals in File Exchange format. Those are your backup files before the corrections were applied. The "fer_" zip files are your Revised descriptions in File Exchange format. The Revised files are the ones you will unzip and upload to File Exchange.
- Save your Files.
When downloading the zip files, you may have the option to "open" or to "save". If you are new to unzipping, then do not "open". Instead, save your zip files to your computer and then unzip. On most systems, clicking the zip file will unzip the contents. On some systems, you can right-click and "extract all". And in many cases, just viewing the zip contents will allow you to drag the included file out of the zip wrapper. The file to be extracted will be CSV format, so the file extension at the end of the name will be .csv. Do NOT open and then resave the file as that will corrupt the data.
WARNING! If you feel compelled to actually open and review the CSV file, please note that Excel displays eBay's 12-digit item number as an exponential number. Do NOT resave the file if you are seeing a number that looks like 2.22E+11 or like 221856000000 with a lot of zeros at the end. If you wish to revise the file in any way, then change the ItemID column format to "Number" with 0 decimal digits within Excel so that it correctly displays as 12 digits in Excel. Otherwise, you can look, but don't touch.
If you do inadvertently corrupt the data, no information is lost. You can retrieve the saved zip file and try again, or you can repeat a scan to generate new zip files.
- Open File Exchange.
Open eBay's File Exchange Center management page on the US site:
https://bulksell.ebay.com/ws/eBayISAPI.dll?FileExchangeCenter
If posting to another eBay site, find the File Exchange Center for your site:
US | CA | AU | UK | DE | FR | IT | AT | ES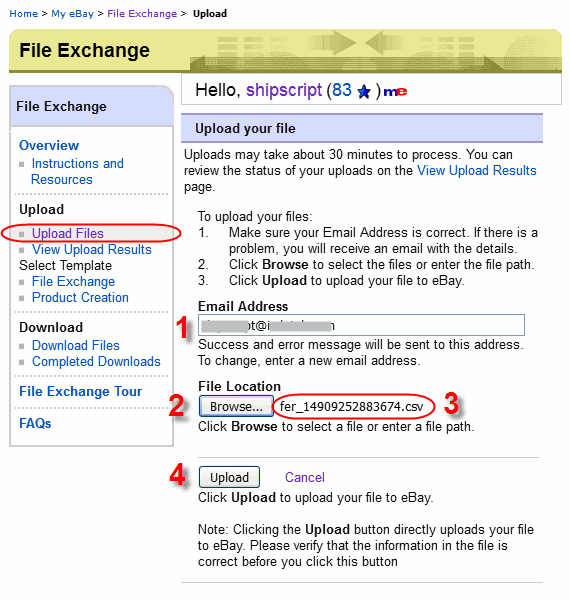
In the left column, click the "Upload Files" link to access the uploader screen.- Enter your email address.
- Click the button to find your "fer_" file on your computer.
- Make sure that the filename displayed next to the button is a .csv type.
- Click the Upload button.
The upload acknowledgment screen will appear, and is your indication that the file was sent (but not yet processed). You will also receive an email that this stage. However, this is NOT the end of the process.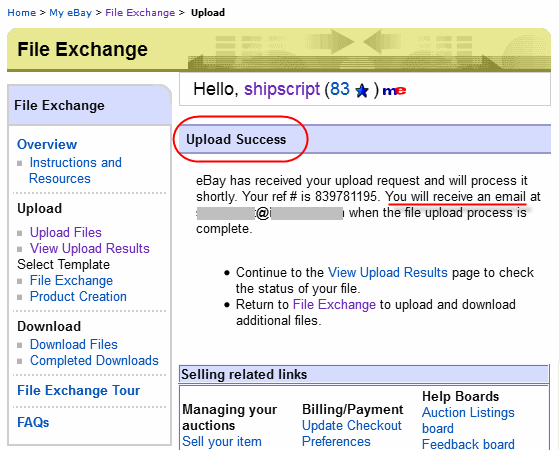
- Get File Exchange Job Status.
File Exchange will place your job in their queue and get to it shortly. You can view the status on the "View Upload Results" page by following the link in the left column.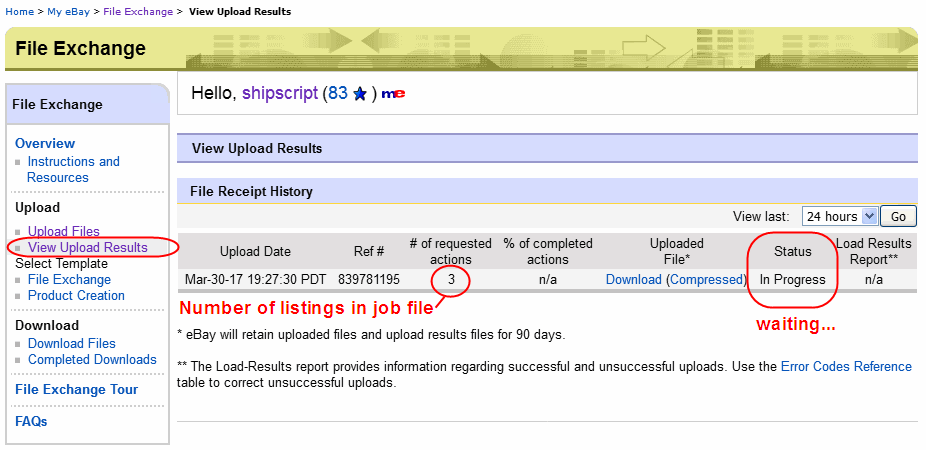
When your upload file has been completely processed, eBay will report back to this screen with a link to download a file. That file will show the results for the uploaded job and for the revision of each listing.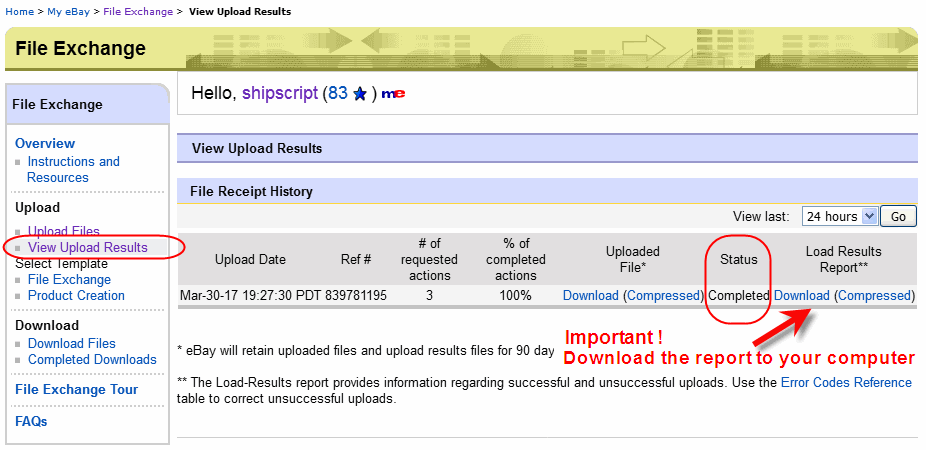
If you have a large job with thousands of items and can open a "gz" file, you may want to save the "compressed" (zip) file, otherwise, the "download" version will suffice for most users.
- Read Job Report.
You must open and read this report to know whether your listings were successfully revised (Success) or whether an error was encountered (Failure). If success on all items, then your job is complete. If there are errors on some items (with bids, ending soon, or already ended), those items will not be revised and will need to be addressed in a later scan. There may also be non-fatal "warnings" and "recommendations" in the file, that do not affect the successful revision.
However, be sure to read the warning messages because eBay is reporting issues that may affect your ability to revise or relist these items in the future.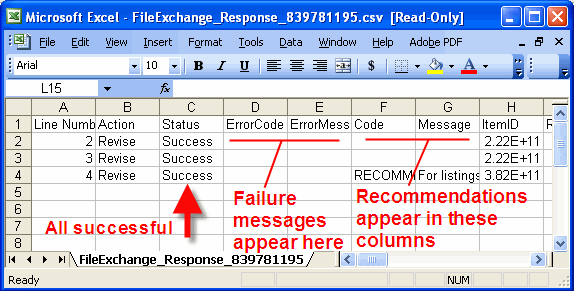
- Verify Results.
After a successful update to your listings, you can run a quick scan using the faster Bulk Scanner to see if any stragglers were missed in the original scan. If only a handful remain affected, use the EXAMINE button on each item to view and manage the revisions from within the Sandbox tool. Alternatively, to rescan missed items, you can copy a column from the scanner results table and load that list into a special box on the Active Content Bulk Editor to run as another File Exchange batch - see the advanced instruction at the bottom of the Bulk Editor Tool).
Active Content Sandbox
https://www.isdntek.com/ebaytools/ActiveContentSandbox.htm
Active Content Bulk Scanner
https://www.isdntek.com/ebaytools/ActiveContentScanner.htm
Active Content Bulk Editor
https://www.isdntek.com/ebaytools/ActiveContentEditor.htm